Troubleshooting Guide
Identify and resolve some of the most common 3D printing issues or errors that you may be experiencing. Our troubleshooting guide covers a number of 3D printers and filaments with recommendations on how to solve many commonly encountered challenges.
What are you experiencing?
Surface Issues
Under Extrusion

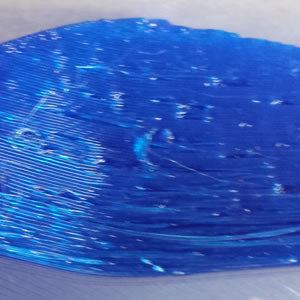
If your lines and passes are clearly defined and are easily separated from one another or not uniform in shape, not enough material is being extruded.
Possible causes and solutions to try:
- Feed tension (flexible filaments): Increase tension at feeders by rotating the screw to the right until the feed evens out.
- Feed tension (rigid filaments): Loosen tension by rotating the screw to the left until the feed evens out.
- Clogged nozzle: Set nozzle to max temp or 250°C (whichever is lower). Feed material until you see a good, even flow from the nozzle.
Over Extrusion

If each line or pass runs into the other lines, causing the excess material to squish into a new area, or the nozzle looks gooey or covered in extra material, too much material is being extruded.
Possible causes and solutions to try:
- Nozzle temperature: Try reducing the temperature in increments of 5°.
- Incorrect filament diameter: Check your software settings to confirm you are set to use the same filament as shown on your spool label.
- Flow percentage settings: Confirm your flow percentage settings are where you need them to be.
- Worn-out nozzle: Replace your nozzle. Brass nozzles do not hold up well to abrasive material. If you have used metal-filled PLA or conductive materials, you may find your nozzle diameter has expanded.
Holes or Gaps

You might be seeing openings in the solid outer shell that allow you to see a previous layer.
Possible causes and solutions to try:
- Too little infill: Adjust your minimum infill. Flexible filaments often require more infill than their more rigid counterparts. For NinjaFlex®, try to keep your minimum infill to 20%. For Cheetah®, try to keep your minimum infill to 10%. Keep in mind that part complexity and where the infill actually lands can make a big difference.
- Not enough solid top layers: Add additional top layers at end of print.
- Feed tension (flexible filaments): Increase tension at feeders by rotating the screw to the right until the feed evens out.
- Feed tension (rigid filaments): Loosen tension by rotating the screw to the left until the feed evens out.
- Clogged nozzle: Set nozzle to max temp or 250°C, whichever is lower. Feed material until you see a good, even flow from the nozzle.
Stringing or Oozing

You’re seeing wisps or strings of extruded plastic on the outside surface of the finished part that are not a part of the original design. Some can be removed easily, while others need to be cut or scraped off. They can ruin a print by making it look less than perfect, but this commonly occurs with flexible filaments.
Possible causes and solutions to try:
- Travel speed: Increase your travel speed between points.
- Print temperature: The cooler the temperature, the less oozing you will see.
- Nozzle temperature: Try reducing the temperature in increments of 5°.
Overheating

If the material is heated past its optimal print temperature, it gets too soft and can bubble, boil or burn, making it difficult to print. Each 3D printing material has its own optimal printing temperature, and each printer is different. Printers and materials can range from a print temperature of 180°C to 250°C. Some materials handle a wide range of temperature, while others handle only a 5° range.
Possible causes and solutions to try:
- Cooling fan: Add a cooling fan or increase your existing cooling fan speed to max speed after the 1st or 2nd layer.
- Print temperature: Cool your printing temperature down in increments of 5°.
- Layer time: Add a layer timer of 20 – 30 seconds.
- Print speed: Decrease print speed in increments of 2 mm/sec if you’re already printing at recommended speed settings.
Weak Infill

You’re seeing an infill that appears thin, weak or uneven. It may skip or tear and have open holes with no infill present. The lines on the inside are typically not as thick as the outlines or shell surface.
Possible causes and solutions to try:
- Clogged nozzle: Set nozzle to max temp or 250°C (whichever is lower). Feed material until you see a good, even flow from the nozzle.
- Spool issue: Check for a feed issue or if filament may be knotted or wrapped around the arm.
- Print speed: Lower the print speed.
Gaps Between Infill and Outline

You’re seeing gaps appear in the corners created between the outer shell and the infill’s diagonal lines.
Possible causes and solutions to try:
- Not enough overlap: Increase overlap in increments of 2% (0.02).
- Print speed: Slow the print speed of the infill.
Curling / Peeling off Print Bed

You’re seeing the print beginning to peel up from the print surface at corners, or thin sections curl up during printing.
Possible causes and solutions to try:
- Poor adhesion: Try blue painter’s tape or a standard glue stick. This is not typically an issue with flexible filaments, but it can cause issues with more rigid materials.
- Use a heated bed: Suggested temp specs 80°C to 110°C.
- Add a brim or raft at start of print.
Surface imperfections

If you’re seeing drips or scars caused by the nozzle passing over an already finished section of the print, you might be over extruding.
Possible causes and solutions to try:
- Nozzle temperature: Try reducing the temperature in increments of 5°.
- Incorrect filament diameter: Check your software settings.
- Travel speed: Increase travel speed in increments of 5 mm/sec.
- Scarring – Z-hop: Adjust to be, at minimum, equal to your layer height.
Side Layer Surface Issues

You’re seeing one section of a print that looks poor or textured, while other surfaces of the finished print are clean and well-formed.
Possible causes and solutions to try:
- Material flow rate: Increase the flow percentage or increase the extrusion multiplier by 5% at a time. If your software permits, you can also decrease the filament diameter by 3% to 5% or decrease the nozzle diameter by roughly 10%.
- Restart distance: Increase or add restart distance after retraction.
Clumping on Top Surfaces

You’re seeing wads or lumps of spare/oozed filament deposited on the outer surfaces of a print.
Possible causes and solutions to try:
- Printing temperature: Increase your printing temperature in increments of 5°. This allows the material to flow better and stretch across openings in the infill, preventing it from breaking and clumping on infill walls.
- Top and bottom surface speed: Decrease your top and bottom surface speed to allow the nozzle to perform a more precise application of the filament during each pass.
- Too little infill: Adjust your minimum infill. If you have infill that is too sparse, the filament can sag or clump between supports, creating blobs that then stick to the nozzle and become clumps on outer surfaces. Flexible filaments often require more infill than their more rigid counterparts. For NinjaFlex, try to keep your minimum infill to 20%. For Cheetah®, try to keep your minimum infill to 10%. Keep in mind part complexity and where the infill actually lands can make a big difference.
- Number of surface layers: If your surface layers are less than three or the shape of the surface layers is challenging, consider adding additional layers to even out the top surface.
Overly Matte or Textured Surface Finish

You’re seeing print results with a textured surface. NinjaFlex® specifically should have a smooth, glossy finish. This error is typically seen on the sides but can be on a top surface occasionally.
Possible causes and solutions to try:
- Too much retraction: Try turning retraction off, then add small amounts of retraction back in until you find a good balance between retraction and material feed. If your software allows for it, you can try adding a restart distance.
- Partially clogged nozzle: Check to see if the nozzle has a partial clog or a piece of previous rigid filament obstructing it. This is common if switching from ABS or other high-temperature rigid materials.
- Too much heat: Decrease the temperature. Too much heat can make the material bubble or break down, giving the outer surface a textured look.
- Not enough heat: Increase the temperature. This can make the flow from the nozzle irregular and uneven, leading to a textured, more lumpy surface.
Outer Shell Not Sticking to Inner Shell

You’re seeing the print’s outer shell separate from the inner layers with no appearance of adhesion.
Possible causes and solutions to try:
- Outer shell speed: Decrease the outer shell speed to the same as or close to your bottom layer speed.
- Material flow rate: Increase the flow percentage or increase the extrusion multiplier by 5% at a time. If your software permits, you can also decrease the filament diameter by 3% to 5%, or decrease the nozzle diameter by roughly 10%.
- Partially clogged nozzle: Check to see if the nozzle has a partial clog or a piece of previous rigid filament obstructing it. This is common if switching from ABS or other high-temperature rigid materials.
Filament Feed
Filament Feed Failure or Mid-Print Stoppage

You’re seeing the print head moving, but no filament is flowing out of the nozzle.
Possible causes and solutions to try:
- Grinding filament: Typically caused by too much tension at the feeder gear.
- Feed tension (flexible filaments): Increase tension at feeders by rotating the screw to the right until the feed evens out.
- Feed tension (rigid filaments): Loosen tension by rotating the screw to the left until the feed evens out.
- Clogged nozzle: Set nozzle to max temp or 250°C (whichever is lower). Feed material until you see a good, even flow from the nozzle.
- Filled or worn-out hobbed gear: Clean bolt teeth or bite gear teeth. If worn out, replace gear.